Summary
The backpack is a well constructed and comfortable piece of equipment that has plenty of space for cameras and accessories needed on small shoots or quick excursions in the field.
The foam padded, velcro attached dividers in the bottom section and the multitude of pockets and sections provide the user with a number of load-out options and coupled with the ability to access the main camera compartment via the front zips or from inside the backpack should cater for most photographers needs.
The included rain cover is a welcome addition and fits the bag nicely.
Its waterproof-ness has been tested in the field and has shown no evidence of leakage.
Its main purpose of carrying expensive equipment around safely and securely has been achieved all with the same level of quality and attention to detail as would be expected in a Manfrotto product.


Product Details
·Unit Manfrotto Active Backpack 1
·Model mb ma-bp-a1
In the box
·Manfrotto Active Backpack
·Waterproof cover
·"Is It Genuine" guide
·Card containing summary specifications and warranty web address
Specifications
Unless stated otherwise, these measurements were taken by the reviewer.


Looks
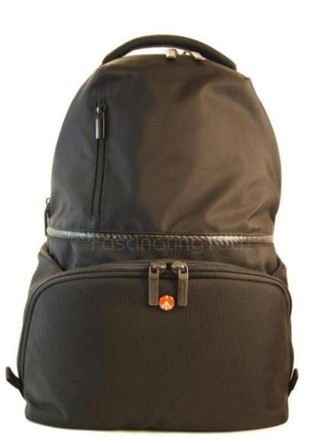
The backpack is a standard black nylon affair with a few "Manfrotto red" colour accents on tags and the obligatory logo button.
The top half has a smooth nylon coat with a side pocket and two separate top partitions accessible via zips.
The bottom half has a rough nylon exterior with a double zipped access point to the main camera compartment.
On either side are slots designed to accommodate the legs of small monopods or lightweight tripods with a tripod tie point on the right.
The back is again nylon covering some nicely textured foam padding.
The shoulder straps are nicely positioned and have ample padding for all of their length.
The strap adjusters are quite small and plastic quick release design but there is plenty of length in the adjustable straps themselves.
The zip teeth are nylon with chunky metal fasteners and 4cm \ 1 ½" metal tags that can be gripped while wearing thick gloves (useful for December weather).
Behind the shoulder straps you find another strap running horizontally across the backpack, providing an extra lifting point if you do not want to use the well padded carry handle on the top.
The top carrying handle has 1 ½ cm\ 3/4" clearance between the itself and the bag, allowing it to be carried easily while wearing gloves.
Inside
The inside of the backpack is finished in a nice grey polyester material with some tight and nicely presented stitch work...
... Why am I focusing on this?
I have had a few cheaper bags where:
a) Stitching became loose and frayed causing holes to appear round zips, letting in rain
b) Straps became worn causing the bag and contents to slip off shoulders
c) Over-zealous packing caused monopod feet to poke through thin dividers...
If the details are sharp, then you know some effort has been put into making a usable and long lasting product.
This Manfrotto rucksack is a nicely tailored, nicely finished, and well constructed unit that should provide years of good service without breaking down at an inopportune time.
Access Points and Pockets
In the top \ front of the bag is a zipped access point. It's big enough to hold small items such as business cards or paperwork but not much else.
It's a thin pocket running 17cm around the front of the bag so big enough for some folded A4 sheets.
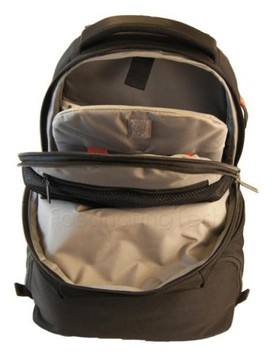
Next is a compartment accessible by a single zip that provides access to a shallow partition containing a zippered netted area. It's the full size of the top half of the bag but again is quite thin.
The netted area could be used for batteries or other small objects that you do not want rolling around, while the space in front is big enough for a small notebook and pen or other thin \ small objects.
Next is the main compartment accessible via a double zip system (where you can open on the left, the right or down the middle.
Opening this up provides access to a large-ish area suitable for light accessories or ones that you don't mind rolling around. Or a sandwich box and small thermos flask of coffee... or a small hip flask of Red Breast Whisky or similar. The walls are nicely padded to the left and right with a padded compartment behind it.
The floor of this main compartment is the top of the main camera storage area.Its coloured "Manfrotto Red" and is actually quite thin - Thinner than the side padding or the shoulder straps so I would not recommend storing anything heavy here.
The camera compartment is accessible from here as the "bottom" of the compartment has a zippered access point which, while initially fiddly to access, opens up easily enough.
Access to the camera compartment is not restrictive and its quite easy to pull out lenses, flash units, light meters etc... without snagging on anything else.
As mentioned above, the main compartment is well padded at the back.
This back portion has two thin pockets (for lens cloths or pens for example) stitched into it with a velcro fastening at the very top.
Undoing the velcro gives access to a final compartment that can be used for stowing a medium sized laptop or tablet. The section runs the whole depth of the backpack and can accommodate something up to 36 cm x 22 cm x 4 cm in size without impacting the rest of the storage area unnecessarily.
Going back to the outside of the backpack once again, the lower half of it has a double zipped access point that gains access to the main camera compartment.
Undoing the zips allows the compartment to fall forward a little bit to make access a little easier (although you can pull the compartment further forward, or remove it completely).
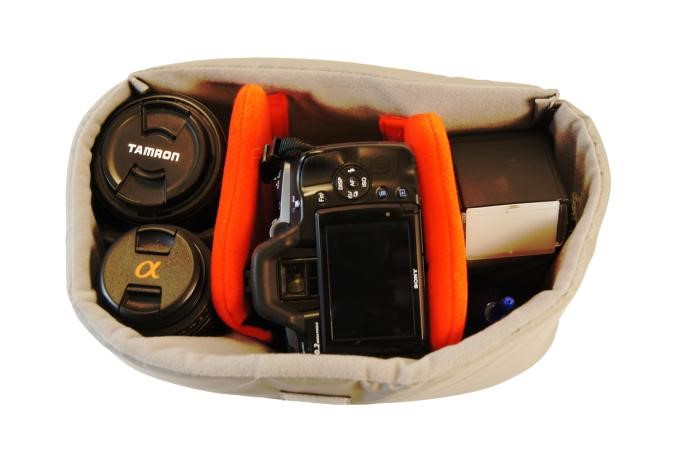
The compartment is well padded on all sides with two chunky red velcro dividers and three smaller grey ones, giving you up to 6 cubbyholes to stow your equipment.
Any or all of the dividers can be moved, repositioned or removed, as you would expect, and is big enough to handle a body + small lens, a second lens, a flashgun and a few other bits and pieces.
If you need to carry more, then a bigger bag with more padding may be a better idea.
As a general purpose walk-around bag, it can hold a usable amount of equipment.
Finally, the bag has two side slots that are deep enough to hold the feet of a monopod or small tripod.
The right hand side also contains a stitched loop that can be used to attach a small bungy cord or similar to further secure the tripod.
The slots can't really be used for anything else.
Downsides?
I have had issues with some nylon zips previously with teeth being pulled out or knocked out of shape.
The teeth on this backpack are quite small (considering the size of the zip pull itself) but they seem well anchored to the bag being (glued?) and stitched to some decent amount of tape.
Small teeth are usually used to help keep water out - The smaller the teeth, the tighter the seal, but time will tell if these teeth become worn or damaged.
The zips themselves do not have any internal tape behind them (which can aid water resistance) but as the bag comes with a nicely fitting nylon cover (water repellent, not water proof) it's not a big issue.
When the number of partitions increase, the amount of "usable" space diminishes. It's nice to have compartments for memory cards or business cards, but when there are a large number of these then the area set aside for larger pieces of equipment either reduces, or the padding used lessens or gets thinner.
This bag has 2 too many dividers \ pockets in the top half for my preference but they are thin enough that I won't lose any space if I don't use them.
Protection
The bag has a good amount of padding all round so should protect equipment from occasional drops or knocks.
More padding on the bottom would be useful as you can sometimes misjudge the distance to the floor and drop the bag a little further than anticipated, or drop it onto rocks or stones if out in the field (do you store your cameras with the lens pointed up, or pointed down?)
The bag is well made and well put together so I don't think holes or splits appearing (and losing contents through them) will be a big concern.
Security
There are plenty of stories (and videos) of pickpockets distracting owners while partners open up rucksacks and bags and steal the contents.
Camera bags usually contain expensive equipment and if you think this is a concern they I recommend that you purchase a small padlock with a bar that could fit through the holes in the zippers of the main camera compartment.
Even though the padlock could be (easily) broken, doing so may prove too much of a hassle for the opportunist thief, especially if you are carrying the rucksack at the time. Some may say that having a padlock may entice a thief - it's a personal decision.
What may be useful on a backpack like this is to allow the zips to be pushed further into the side pockets (at present they stop AT the side pocket). If they were to end further down inside, it would make it much harder for the pickpocket to gain access to it without you knowing, even if you are being distracted by someone else at the time.
In use
The backpack sits comfortably on the body with the weight nicely at the bottom and resting just above the small of my back. I have taken it on a couple of small hikes and it did not chaff or rub against my shoulders during the time I used it.
The padding was adequate and I didn't notice the carry \ reinforcing strap that runs across the top part of the bag over the padding.
With all the metal zip pulls there was a certain amount of jingling but nothing too distracting.
The straps needed to be pulled in a bit and the loose ends ended up being rolled up and held in place with elastic bands to stop them flapping around and against me.
Out in the field, the camera compartment was easy to open and close without any unnecessary fiddling around and the equipment was easy to stow back afterwards. If you pack too much equipment then there will be problems with the remaining contents shifting around and making stowing more difficult, but as it's designed as a light (occasional?) bag then not much kit would be taken anyway.
The other compartments were just as easy to access (nice chunky zip pulls) and the netted area kept the loose batteries and other paraphernalia in one place.
I didn't try to access the camera compartment via the inside of the bag so cannot confirm how easy it is to access it during high winds, but I did leave my camera in the top section for a short time and it survived being knocked around while I clambered over some trees and mud banks.
Being nylon, the outside of the unit was a doddle to clean (damp cloth & elbow grease) and quick to dry out. The same went for the rain cover - It was easy to put on and take off while in the field, in the evening, and was easy to dry off after a short rain spell.
Accessories
The bag comes with two accessories - A rain cover and an extra strap that connects the two shoulder straps in front of you.
Rain Cover
The rain cover is finished in the same colour grey as the internal finish of the bag.
It's a one piece affair made up of three well stitched panels and an elasticated rim that fits over the front, top, sides and bottom of the rucksack, leaving the back panel and shoulder straps bare (so you can carry the rucksack as normal).
During the review the rain cover was used during a couple of light showers. It was easy to put on and take off, and protected the bag quite well. Some waterproofing sealant may be useful if it does not affect the material, especially across the stitching (usually the weak point).
It rolls up quite small and can be stored in one of the many rucksack pockets for easy access.
Extra Strap
I have found two uses for this strap.
When carrying the backpack across your back, the extra strap can be used to connect \ fasten the shoulder straps in front of you. During long hikes this can be a useful device to reduce the amount of movement across the shoulders, or to make it more difficult to dislodge the backpack. The shoulder straps have the appropriate connectors on them at mid chest height but it's a matter of preference if you use this or not.
Alternatively, the strap could be used to help fasten a tripod to the backpack.If the tripod is slotted into the right hand side pocket (standing upright), the strap can be looped around the tripod and through the securing loop (stitched into the side of the backpack) to hold it steady and secure it.
Again, it's a matter of taste if this is used in preference to a small bungy cord but it's nice to know it's there.
Like the rain cover, the strap can be stored in one of the available pockets.
Review Style
This review is intended to highlight the pros and cons of the item under review, not provide details on how to use it.
Where notes on use are provided, these are the reviewers observations at the time of review and may not necessarily represent the best, easiest, recommended or proper use of it.
Review images \ videos and capture device
Where photographs are provided for this review, they were taken by the reviewer unless
explicitly stated otherwise.
Equipment used could consist of:
Main Camera
·Sony α 580 DSLR
·35mm f/1.8 prime lens
·18-55mm f/3.5 - f/5.6 zoom lens
·Other lenses and equipment
Imagery and videos
All review images and videos are (c) by me and used on the Fascinating Tech website with my permission.
Images for this (and other) reviews can also be found on my personal website at:
Videos can be found hosted on YouTube under my channel
Use of imagery and videos
If you wish to use any of my review images or videos on another site or in another publication, please contact myself and \ or the editor of Fascinating Tech and wait for permission first
You may use any other images taken by me and found at knuks.net/finepix for any other purpose so long as:
·it's in accordance with the Creative Commons Attribution, Non-Commercial, Non-Derivative license that is displayed on my web site \ on the Creative Commons web site
·it does not place me or the images into disrepute
·they are not used in illegal (UK or readers locale - whichever is less lenient) or questionable publications - I have sole discretion in deciding what is "questionable".
Disclosure
I consider myself an enthusiastic amateur photographer who is always learning, always willing to learn, and a bit of a jack-of-all-trades.
I like landscape and macro photography but have no affinity to any single theme, experimenting with astro-photography, HDR, compositing and the like.
My kit is mediocre by anyone's standards but I am building it up as I go - My Manfrotto MTX055XPRO3 tripod and my cable release are my closest friends.
