Defishr is an automatic video fisheye corrector application for Windows®. Defishr is highly effective at removing the warp and perspective (compression) distortion caused by very wide angle camera lenses on GoPro-type action cameras, DSLR cameras fitted with wide angle lenses, and even mobile phones with wide angle lenses. Fisheye is most commonly introduced to video shot on these types of cameras when the camera pitches up and down, which causes the video to appear warped or bent.
Defishr is as easy to use as it is effective. To remove fisheye from a video clip, a user simply drags a video clip into the Defishr app, selects the camera model that recorded the video from a drop-down list and the fisheye distortion is instantly corrected. Want more correction options? Defishr includes a suite of manual lens correction tools to fine-tune the lens angle, zoom, even rotate the video and correct minor camera placement problems. If a user’s camera & lens combination is not in the list of camera profiles, Defishr includes an innovative camera calibrator tool, which can be used to create a custom camera profile. Corrected video is rendered and exported from Defishr in industry standard formats.
Summary
Defishr is a standalone video manipulation application from ProDAD that provides simple and effective tools to help reduce fisheye distortions introduced by wide angle lenses. The ability to select (and tailor) preset adjustments makes start up very easy, and being able to add to the list and make "on-the-fly" adjustments provides the enthusiast some welcome control. The output can include split-screen (original and adjusted output) which is VERY useful in order to check in your favourite video player (outside of the software) and make any final adjustments before the final output is generated.
Review
The following review is intended to highlight the benefits and limitations of the system, not provide details on how to use the application.
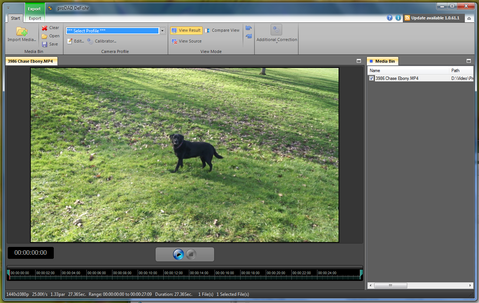
Start up UI
The UI follows a similar layout to the other products being reviewed - Defishr, ProDrenalin, Mercalli and ReSpeedr - with a tool ribbon across the top of the UI, a video preview area in the centre, a timeline beneath it and a tool box properties window on the right hand side.
On the up side
It's a simple and effective layout with an uncluttered set of icons and buttons all separated by an appropriate amount of space. The "Additional Correction" area expands to a panel when the panel is enlarged or condenses to a button with a drop down panel if the areas shrinks. The video area and right hand properties area can be expanded contracted by the user at any time.
On the down side:
There are a few control usability differences between this and ReSpeedr ...
• In ReSpeedr you can drag and drop files into the centre panel while in Defishr you need to drag them into the Media Bin panel on the right hand side
• The Export button is in the same location but a different icon
... but nothing that detracts from the use of the software, and all suitable for the tool in use.
Input formats
The software caters for
• Video: .mov, .mpg, .mpeg, .mp4, .mts, .m2t, .m2ts, .m2v, .avi, .wmv, .mxf, .vob, .vcd, .3gp,
• Image: .jpg, .tif, .png, .tga, .gif, .bmp, .dpx
o Not sure why these are included. Not processed by the application
Output formats
• Video: .mp4 (MPEG-4) only
Preliminary Activities
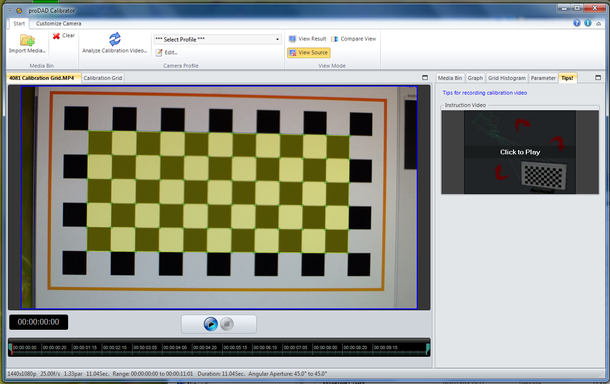
Calibrator
If setting up a new profile (new item not on the list of preset devices lenses), it is recommended you use the Calibrator. This displays a chequer board image on the monitor that you then video using the device lens in question. Once complete, the resulting video is uploaded into the calibrator which then analyses the footage, compares it to the expected results and identifies the parameters to correct any lens distortion. The videoing of the image is done in a prescribed manner to attain the best results - See hints.
Minor issue
My Sony Alpha Camera allows video to be shot in MP4 or AVCHD, while my Samsung allows for MP4 only. When the Sony MP4 files were uploaded into the calibrator it stated that "Anamorph, S3D or Interlaced video was not supported." This was possibly due to the aspect ratio of the image.
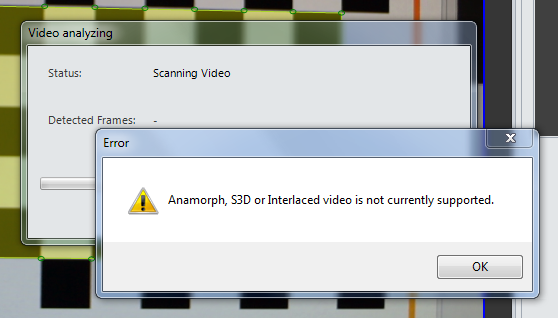
This was circumvented by uploading an AVCHD video instead (as the "image" through the wide angle lens is the critical element, the file system used to record the image is irrelevant.
No such issues were found with the cameras AVCHD format or the Samsung S4 MP4 format and the Sony generated MP4 files loaded into the main Defishr application without any issue.
Analysing the video
During processing calibration, the software looks for key frames in the input file. The number of "good" frames is displayed on the progress message. If the chequer board slips (partially) out of view or the image is too shaky, the number of good frames reduces. Once 20 good frames are reached, a calibration profile can be set. The more good frames found, the better the calibration.
Once complete, the resulting output footage is displayed (and compared with the original), along with the calibration grid.

In Use
Loading Files
File(s) can be loaded using the Import Media button or by dragging files onto the Media bar. Files open quickly and the number of files opened seem to be dependent on the amount of memory available to your PC.
Using the timeline
As with ReSpeedr, you can use the timeline to trim the input video by dragging the start and end points across the timeline. However, you cannot zoom in or out of the time line (fine control) nor set multiple trim points. In practice this is not an issue as you can:
• Use the mouse scroll wheel to jog forward back a second at a time (fine control)
• Set one trim area, export, set another trim area, export ...
Using the preview
The tool ribbon allows you to set what appears in the preview window.
• Result - The adjusted video is displayed
• Source - The original video is displayed
• Compare - Split screen with original footage on left and adjusted footage on right is displayed
I found the split screen very useful when comparing the footage. The devices I used (Sony Alpha 580 and Samsung Galaxy S4) introduced only slight distortions and the split screen (and toggling between source adjusted) frames allowed me to tailor the parameters for a pleasing look.
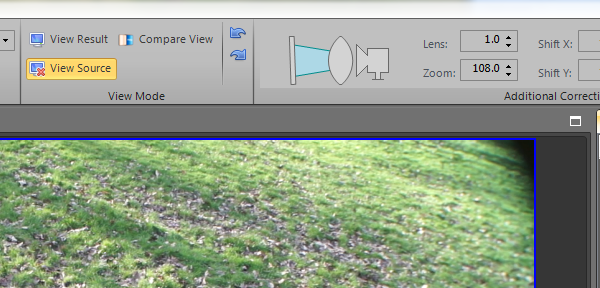
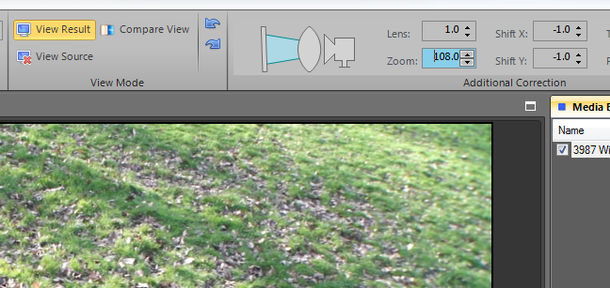
Additional Corrections

If the footage needs further adjustments, the user is able to do this via a simple panel in the tool ribbon. The sections are self explanatory and can be changed via the arrows, or by typing in values. If using Result or Compare previews, the results of the adjustment can be seen immediately in the preview area.
For my Camera and wide angle lens, a zoom of 108 removed the vignette an occlusions in the corners of the image.
Saving files
Unlike ReSpeedr, the application only outputs an mp4 format file. Its good quality (even at medium setting) and doesn't take long to generate but file sizes increase accordingly
A 38 second, 1440 x 1080 x 25 fps source file took on average:
(Thee three valies shown are for Low, Medium and High quality respectively)
Export time 97 seconds, 51 seconds, 71 seconds
File Size 21 MB, 62 MB, 201 MB
Maximum YouTube Quality 144p, 1080 HD, 1080 HD
Sample Videos
Video footage has been uploaded to YouTube at the following locations:
Original Footage
3985 Base Video.MP4 http://youtu.be/JYucSG7A2_Y A580 Base Video
3986 Chase Ebony.MP4 http://youtu.be/UZ7c4Tte9jU Standard lens with movement
3987 Wide Angle 1.MP4 http://youtu.be/z2uKBpC1i04 Wide converter
3988 Wide 2 and chase.MP4 http://youtu.be/nWdbXzQEPZ8 Wide converter + movement
3989 Jerky Wide Puppy.MP4 http://youtu.be/R3_Oiar8Kkw Wide converter + movement
3992 Jerky Ground.MP4 http://youtu.be/ns_Ul_aRJ3o Wide converter + close ups
3993 Jerky Swans.MP4 http://youtu.be/n_GHQwxoPp0 Wide converter
3995 Jerky Pond.MTS http://youtu.be/Q9f0LF7rliU Wide converter
Calibration S4.mp4 http://youtu.be/bvGJaBd2QZA S4 video of Mercalli calibration
00036 Calibration.MTS http://youtu.be/eCrEw1zAPgI a580 video of Mercalli calibration
Ebony S4.mp4 http://youtu.be/BbbDK-mbKD0 Base video using Galaxy S4
Processed Footage
3987 Wide Angle 1 Defishr1 http://youtu.be/3IHdL2dnSKk Defishr
3987 Wide Angle 1 Hi http://youtu.be/us2YIND93oY Defishr - High Quality
3987 Wide Angle 1 Med http://youtu.be/rTp1_3XNRuw Defishr - Med Quality
3987 Wide Angle 1 Low http://youtu.be/RRsVMiidILg Defishr - Low Quality
3988 Wide 2 and chase Defishr http://youtu.be/znHMgT8ImQk Defishr
3992 Jerky Ground Stabilised http://youtu.be/ndVo2J-LVVE Mercalli
3993 Jerky Swans ProDrenalin http://youtu.be/38PzMpUED5Q ProDrenalin
3993 Jerky Swans Stabilised http://youtu.be/FZ04bkwKnxI Mercalli
3993 Jerky Swans Stabilised ProDren http://youtu.be/mtMD7CG9YcU Mercalli & ProDrenalin
Calibration S4 Stabilised http://youtu.be/NRGOq76yGSg Mercalli
00036 Calibration Pro http://youtu.be/rLEF7NYvmeg ProDrenalin
Ebony S4 Processed01 http://youtu.be/7I6jKbKYLzU ProDrenalin
Equipment used
• Sony α 580 DSLR
o MP4 1440 x 1080 x 25 fps
o AVCHD 1920 x 1080 x 25 fps
• Sony 18mm - 55mm standard lens SAM1855
• Digital King Wide Angle Converter DSW Pro x 0.7
• Samsung Galaxy S4 GT-I9505 (Android 4.3)
• PC Hardware :
o Handbuilt i3-2120 @ 3.3GHz,
o 8GB RAM,
o 2 x 500GB HDD,
o GeForce GT430PC
o Windows 7 Professional (64 bit)
• Defishr
o Version 1.0.59, 32 bit, Full version (1.0.61.1 available post review)
Hints, Tips and Notes
• Clearing (deleting) a source item is done immediately and with no prompt
o Click on ribbon tool [x] Clear, or select an item in the Media Bin and press [DEL]
• Use the Save Project option to retain the settings of the current session
Calibration hints
• Make sure you have enough room around your monitor to video the image from ALL angles.
• Start videoing and move the device around the monitor:
o Focussing on the centre of the chequer board
o Keeping the complete chequer board image in the viewfinder at all times
o Get in close to the monitor - Don't worry about using extreme angles
• Once complete, keep the camera perpendicular to the monitor and move it around again
o This time move horizontally until 1/2 the image is offscreen,
o Then move Up (until partially offscreen), then left, then down.
