ReSpeedr is a standalone video manipulation application from ProDAD. It's purpose is to provide a simple and effective way of speeding up and slowing down video clips and generating professional looking output.
Summary
The application is small, compact and does exactly what it says on the tin. It generates good quality output files with a very shallow learning curve; Its suitable for the beginner wanting to experiment with speed up and slow down, through to the enthusiastic amateur who wants to process numerous files.
An obvious comparison is against YouTube and its Slow Motion enhancement.
• YouTube allows for up to 1/8 slow-motion. ReSpeedr caters from much slower speed.
• YouTube slow-motion (1/8th) quality seems to be on par with ReSpeedr Frame Blending @ 1/10th speed.
o ReSpeedr Optical Flow looks superior at the same 1/10th.
• YouTube does not cater for speed-up
Review
The following review is intended to highlight the benefits and limitations of the system, not provide details on how to use the application.
In the sample videos I used a Samsung Galaxy 4S (a common phone) with standard settings to emulate what a typical person may use.
• Resolution 1920 x 1080 (16:9)
• Video Stabilisation On
• Frames per second Variable but typically above 25fps
The footage processed includes a dog shaking water from itself after a swim. The amount of movement involved would put most software products to the test.
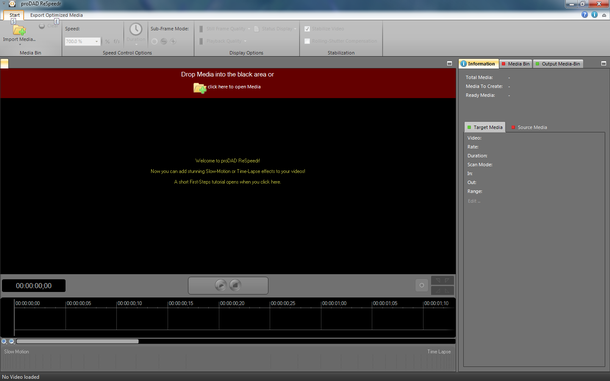
Start up UI
The application launches very quickly and presents a basic and functional user interface split into 4 key areas:
• Along the top - Menu functions ribbon
• On the right - Information on the video clip, Input files, Output files
• Central - Video preview replay area
• Bottom - Timeline for trimming, and setting work areas

The core functionality begins once the user loads video clip(s) by drag dropping into the preview area or using the Import Media function.
The application allows for multiple files to be opened concurrently with the limitation appearing to be on the amount of memory and processing power available to the system. With multiple files opened, they can be processed individually and then output in batch.
It's worth noting that the application drops the audio track of the video clips being processed. This makes sense it is manipulating the time flow of the video. If this was to extend to the audio track, it too would speed up or slow down.
If you wish to retain the audio (or parts of it), it has to be re-attached using another application.
On the down side:
The UI is a little untidy and some of the menu controls and labels are a little confusing: EG
• "Clear" button is easy to click on and drops ALL video clips without prompting
• Render Quality is displayed as Render Qualität
• Compression Quality has options of High (large file size) to Low (small file size) instead of
o "Compression (High - Small files, low quality) to (Low - Large files, high quality)" or
o "Quality (Low quality, small files) to (High quality, large files)"
• The help system is very basic and of varying quality
On the up side
• You soon learn to stay clear of the Clear button
• The UI is intuitive and easy to get to grips with
• The help system is enough to prod you in the right direction
Input formats
• Video: .mov, .mpg, .mpeg, .mp4, .mts, .m2t, .m2ts, .m2v, .avi, .wmv, .mxf, .vob, .vcd, .3gp,
• Image: .jpg, .tif, .png, .tga, .gif, .bmp, .dpx
o Not sure why these are included. Not affected by the application
Output formats
• Video: .mp4 (MPEG-4), .mov (Quicktime)
Preliminary Activities
Once a video is loaded, but prior to starting speed up down work proper, the application can be requested to "stabilize" the video.
Stabilisation
By selecting the menu option, the application will analyse the video clip, looking for user introduced movement (camera shake or tilt) and compensating for it. The system looks for 6 key characteristics and once analysed introduces the appropriate amount of "opposite-movement" to reduce the appearance of the shake.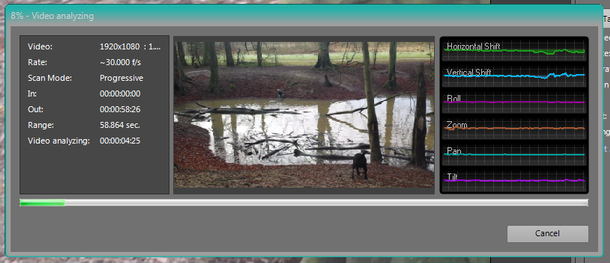
Rolling Shutter
The application can also be requested to correct some of the errors and artefacts that "rolling shutter" devices can introduce when filming fast moving objects (skewing, foreshortening..) The rolling shutter is found typically on camera-phones, point and click cameras videos, and a number of dSLR cameras.
Using the timeline
Once a video has been loaded (and stabilised if necessary) the user is able to interact with the timeline (bottom section) to:
• Set a new start and end point (trim points) for the output video by dragging blue markers
• Set multiple speed up slow down points by selecting an area (work area) using the green markers then setting the required speed parameter by:
o Clicking on the time RIBBON to specify speed up or slow down (1/50th to X50), or
o Selecting typing a speed factor into the "Speed" box on menu bar, or
o Selecting the "Duration" button and typing how long you want that section to last
• There is no real limit to the number of sections that can be added.
In the image below:
• The original 3minute 38 second clip has been trimmed to 1 minute 51 seconds (blue section)
• A "1/6" speed section has been defined at the 66 second mark, lasting 4 seconds (original) 24 seconds (new elapsed)
• A "X 8" speed section has been added at the 79 second mark, lasting 6.9 seconds (original) 0.9 seconds (new elapsed) - Shown by the pop up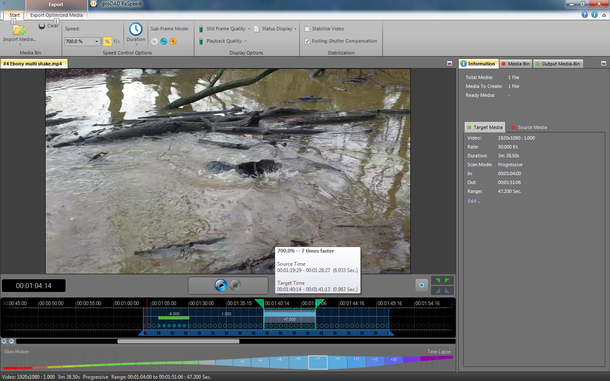
When changes are made, the output can be previewed in the main area of the window. The quality of the preview can be adjusted independently of the output rendering quality.
Slowing Down
There are a number of videos on YouTube showing ReSpeedr slowing down videos (just search for ReSpeedr). In all cases reviewed, the action is generally of large fast moving objects (BMX-er jumping off a ramp, cars on motorway, tomato into a bowl of water). The output is very clear and strong with very little ghosting.
When slowing down video, the system will generate sub-frames by one of two interpolation methods - Frame Blending or Optical Flow. By default the application will select one based on the user preferred output video quality but the user can select a method directly.
Frame Blending
For low quality outputs, but with fast calculations, the system will use Frame Blending. Here, consecutive images are compared and a cross-faded image (sub-frame) is introduced that "blends" the two images together. This is repeated for all interpolated frames.
The up side of this is speed, and in a number of test videos, this has worked pretty well.
The downside is that the chance of ghosting (video aberrations) increases as the fades are for the video frame as a whole.
Optical Flow
For a better quality video, but with a slower calculation hit, the system can perform Optical Flow analysis, where individual pixel vectors (position, direction, speed) are compared and new ones introduced into the sub-frames. Ghosting is generally reduced but may not be completely eliminated.
In both modes, the general output quality is very good even at extreme slow-downs (1/20th or more). As slow down increases, the chance of ghosting or noticeable aberration increases, and if the video includes a large number of small items (such as water droplets from a wet dog shaking itself) the images can ghost pretty badly with the transitions become much more apparent.
Speeding Up
This is fun.
The controls are identical to that of slowing down but in the testing performed, the sub-frame modes (Optical Flow and Frame Blending) appear to have no apparent effect on the video output.
This may be as expected as the system is jumping over excluding frames of the input file, but the output is neither jumpy nor jerky - the output is smooth and seamless (up to the speed rates tested).
Output
Output is either to MPEG-4 or Quicktime only. For the most part this will unlikely be an issue as these are common and good quality output formats.
Time for a cuppa ...
When being output, the system will render the new file using the quality compression values set by the user. Depending on the amount of slow-down introduced, this could run for some time. In the test videos below, the 9 second 1/2 speed video took ~ 1 minute, while the 1/10 speed took ~ 6. Subsequent runs however took quite a bit less so may be influenced by other processes running on the PC.
... and a bigger disk
In addition, output file sizes grow relative to the amount and duration of slow-down. When slowing down videos, new frames are being introduced into the video thus increasing the size of the output file. The slower the slow-down or the longer the slow-down, the larger the file size.
Test videos
A video of my dog playing in a puddle was taken on my Galaxy S4 at 1920 x 1024 x 30 fps
The first video shows a 36 second clip, unedited, just trimmed to 36 seconds. A 9 second portion of this video is then extracted and a 3 second portion of that is then slowed down. This 3 second portion is slowed down to 1/2, 1/4, 1/6, and then 1/10 speed with optical flow and frame blending.
Note: this sample clip was used to highlight the ghosting aberrations that can occur when small rapid changes are present in the input video. This is likely to be worst case. If you examine the water ripples in the pond, rather than the droplets from the dog, you can see a very smooth slow motion effect occurring.
Sample Videos
Original 36 second clip http://youtu.be/grQoCodDVfY ~130s 193 MB
9 second clip with 3 seconds slowed down
1/2 speed with Frame Blending http://youtu.be/Wx53_qFk6BQ ~60s 41 MB
1/4 Speed with Frame Blending http://youtu.be/AFtM9hsgQtw ~90s 54 MB
1/4 Speed with Optical Flow http://youtu.be/azIZ4tT5AoU ~110s 49 MB
1/6 Speed with Frame Blending http://youtu.be/PmqOsKUJDfQ ~150s 79 MB
1/6 Speed with Optical Flow http://youtu.be/2vs_IKRj0xk ~220s 63 MB
1/10 Speed with Frame Blending http://youtu.be/rxn1jpRfDKI ~320s 95MB
1/10 Speed with Optical Flow http://youtu.be/gK_Iu2FWU5g ~400s 68 MB
x6 Speed in Car http://youtu.be/UgxHlFdJFPQ ~ 300s 75MB
The last video shows an example of speed-up; I took the "left hand turn only" route from near my house to the shops, sped up 6 times.
Equipment used
• Samsung Galaxy S4 GT-I9505 (Android 4.3)
• PC Hardware :
o Handbuilt i3-2120 @ 3.3GHz,
o 8GB RAM,
o 2 x 500GB HDD,
o GeForce GT430PC
o Windows 7 Professional (64 bit)
• ReSpeedr
o Version 1.0.33, 64 bit, Full version
Hints, Tips and Notes
• Removing items from the Media Bin is done by pressing [Del] key - No warnings are given
• The "Clear" function closes all videos and leaves the user with a blank UI - no warning
• The application can make use of the GPU for rendering the final video
• Where possible use a tripod to stabilise the camera - this is quicker and more efficient than using software stabilisation and is general good practice for video photography.
• Remember - Audio is stripped from the file
• Always work on a copy of the original file