Richard's Realm - Fascinating Tech Magazine
Main menu:
- Home Page
- Editions
- Spring 2017
-
Older Issues
- Winter 2016
- Autumn/Fall 2016
- Summer 2016 Issue
- Spring 2016 Issue
- Holidays 2015 Issue
- Autum/Fall 2015
- Summer 2015
- Spring 2015
- Holidays 2014 Issue
- Autumn 2014 Issue
-
Summer 2014 Issue
- Summer 2014
- Editorial
- FascinatingTravel -AirWheel Special
- FascinatingGadgets - QI wireless Charging, Low cost router and CrazyTalk
- FascinatingTravel - Safety, recharging and more
- Fascinating Home - Computer Lights! - Voice controlled Home Automation VoxCommando
- FascinatingAudio - Nakamichi AV1 + AV1P and Edifier Connect Extreme
- Competition - win great prizes from Energizer, Edifier, STM, Honestech, WebsiteX5 and more
- Spring 2014 Issue
- Holiday 2013 Issue
- Separator 2
- Reviews
- Separator 4
- Privacy
Richard's Realm
Spring 2017
Richard's Realm
Want to go a little more in depth Richard is your man
In this issue TP-Link HS110 Smart Plug, Magix Movie Edit Pro Premium full in depth, Acer Predator 21 Hand on

First Richard joins in Garry's SmartHome look at Alexa compatible devices
TP-Link HS110 Smart Plug
TP-Link offer a variety of devices that plug directly into the Amazon Echo Smart Home ecosystem, but it is the Smart Plug that most people are likely to encounter first, as it will likely replace an existing timer plug, thus reducing the ‘shock of the new’ that some users encounter with smart devices.
TP-Link offer two versions of the Echo-compatible Smart Plug; the HS100 and the HS110. There are two main differences between the two, the HS110 offers energy usage monitoring while the HS100 does not, and the HS100 is £10 cheaper. This review will focus on the HS110.
Specifications
The HS110 supports 802.11b/g or n wireless networks at 2.4GHz. It will operate between 0°C and 40°C, which may be an issue for some. Size-wise, it is relatively unobtrusive and comes in at 101 x 67 x 77mm, but it would be prudent to measure first. Finally, input and output voltage may be between 100 – 240V, maximum load is 16A and maximum power is 3.68KW, so it’s important to check what the draw is of whatever you’re plugging into it to avoid a potentially expensive failure.
Setting Up
The box contains a quick-start guide, which is pretty much all you need to get up and running. The Smart Plug has a manual power switch on the front, but requires WiFi and an Internet connection to do anything else. TP-Link list an IOS or Android device as a requirement for set-up, and the Kasa app, which is required for configuration, is only available on those platforms.
Kasa
Controlling the Smart Plug (prior to connecting to the Amazon Echo service) is done through the Kasa app. Strangely, TP-Link do not offer a web version of Kasa, so if you do not have a device that can run the app, you are out of luck. There are rumours of a UWP app in development for Windows, but I have been unable to confirm that, so if you don’t have an IOS 8 (or higher) or Android 4.1 (or higher) device, this is not the Smart Plug for you.
Kasa itself is a clean, well designed application with appealing unfussy screens that allow the user to configure the Smart Plug with minimal effort.

Once a device has been added to Kasa, it can be named and accessed from the front screen of the app with a single tap to cycle the power. Other front screen options are ‘scenes’ which adjust all the devices connected to Kasa with one press (for example, turning everything off, bring up the lights in the kitchen and so on). This functionality is analogous to the Groups tools in the Alexa app, but obviously only applies to TP-Link devices.
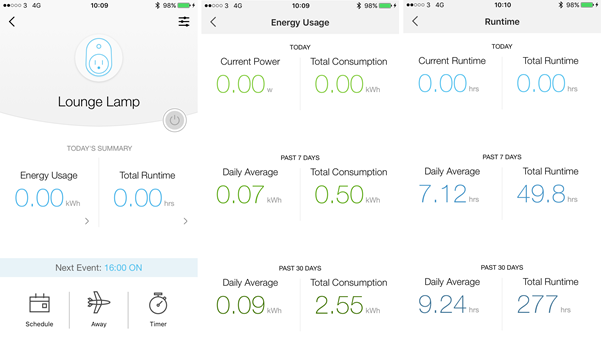
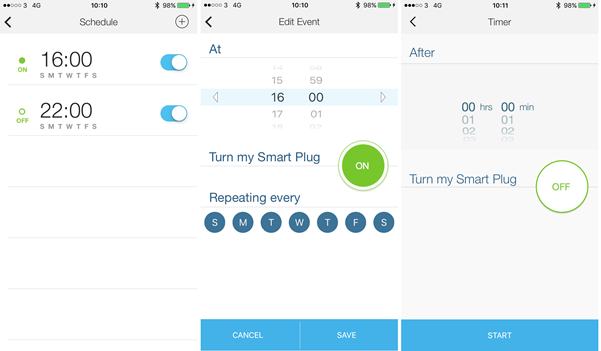
Selecting a device will show some summary information as well as historic usage and runtime data. At the moment, it doesn’t appear to be possible to extract this information, which is a real shame since there is some great data that the amateur statisticians amongst the user base (me included) would find very useful. Other options available are scheduling, setting a timer or setting the device in ‘Away’ mode.
The schedule settings allow a number of ‘ons’ and ‘offs’ during the day, repeated over weekdays as required. The timer is a simple countdown before power is either turned off or on as required. Away mode will make the Smart Plug randomly turn on and off during a set interval in order to simulate actual usage.
All in all, Kasa is a neat app, but let down by the lack of a web version and the inability to extract some of the interesting metrics generated by the Smart Plug itself. It is also a shame that more complex power scenarios cannot be set-up other than what is a relatively simple schedule.
Alexa Integration
One of the benefits of the TP-Link Smart Plug over other products is the ease with which it can be connected to the Amazon Echo without requiring an additional bridge or similar technology (such as IFTTT).
Connecting the Amazon Echo to the Smart Plug is a simple case of enabling the Kasa skill in the Smart Home section of the Amazon Alexa app and then entering the Kasa account information.
Once done, the Alexa app will ‘discover’ all the TP-Link devices connected to Kasa and make them available for use, or for grouping within Alexa (much the same as the ‘scenes’ option in Kasa above). With this tight integration, it is straightforward to control the Smart Plugs with simple syntax such as: “Alexa, turn the lounge lamp off” or “Alex, lounge lamp on”.
Conclusion
Retailing at £34.99 on Amazon at time of writing, the HS110 is not the cheapest Smart Plug out there. However, it is reliable and features seamless integration with the Amazon Echo ecosystem. The lack of a web option for Kasa is unfortunate, but as an easy entry into home automation there is much to recommend the TP-Link Smart Plug.
Next an in depth look at some great Movie editing software
Magix Movie Edit Pro Premium
Introduction
Having taken this product for a quick spin around block in the last issue, this time around I am going to take a more detailed look at the features in this offering from Magix and see if it qualifies as a tool for professional video editing for Microsoft Windows.
What is Magix Movie Edit Pro Premium?
Movie Edit Pro is one-stop shop for tinkering with video. It takes existing video material and allows it to be spliced together or broken into chapters, with the ability to add additional audio tracks, transition and text effects, and music. The results can then be stored as a discrete video file, burnt to DVD or Blu-Ray disc or uploaded directly to the likes of Facebook or file-sharing sites such as YouTube.
The feature list is extensive and in this review, I will only be covering the full Premium product rather than the more limited Plus or Classic editions, or the Control version (which matches the Premium edition feature for feature, but has the ability to control a LED video editing keyboard).
In summary, this is what comes in the box:
· The ability to edit up to 99 tracks for a given video
· 1500 effects and templates
· 4K, HD and 3D support
· DVD and Blu-ray disc and menu authoring
· Colour correction
· Multi-cam editing with up to 4 cameras
· Shot matching (automatically matching the tone and colour of 2 video clips)
· Image stabilisation
· Add-ins including NewBlue Titler Pro for some nicer titles and a fun tool from Motionstudios called Vasco da Gama 9 Essentials for creating some neat route maps for travel videos
Requirements
Magix list the following as a minimum specification for a target workstation:
· 2.4Ghz Dual Core Processor
· 2 GB RAM
· Graphics card capable of a resolution of 1280 x 1024
· 2 GB of disk space
· A DVD drive (if authoring is required)
· An Internet connection in order to download (if required – physical media can be ordered) and activate the software following the required registration.
For more intensive work such as 4K or HD video editing, Magix recommend a Quad core processor running at 2.8Ghz or better and 8 GB of RAM along with a graphics card with at least 512 MB of dedicated video RAM.
For this review, I configured a virtual machine with 8 GB RAM, 512 MB Video RAM and a Quad Core i7 CPU running at 2.8Ghz
Installation
Installation may be from either physical media or downloaded from the Magix.com website. Registering at the web site gives access to all purchases for re-downloading as needed. The Magix.com web site also allows the user to manage activations in the event the user wants to move the installation to a different workstation. De-activating is a relatively straightforward process although Magix only permits one deactivation a month, so plan ahead!
The installation application offers a standard or custom installation with not much to indicate what is actually in the ‘standard’ offering. I like to check all the options, and so selected the ‘custom’ option.
The installer permits the selection of folders for the programs, templates and effects, and the user profile settings for both Movie Edit Pro and the Speed burnR products (more on that later).
Disappointingly, the installer also prompts the user to install ‘simpliclean’, which is a registry cleaner and system optimiser tool. Since one has to pay actual money for the Magix product, it is unfortunate to see this inclusion and doubly unfortunate that the option to install is checked on by default, which may catch out unwary users.
Following installation, the user is prompted to activate the product with the serial number and register with an email address, and Movie Edit Pro Premium is launched.
First Use
Of course, the installer isn’t quite finished just yet. Optionally, Movie Edit Pro Premium will install several GB-worth of templates for fades, menus, music, design and so on. As I said, I like checking boxes, and having had to leave the ‘simpliclean’ checkbox clear, I was happy to install these useful extras.
Once installed, the user may create a new Project, specifying a name and the target format for the output movie (for example, PAL 1080p, 4K and so on) and the audio sample rate. Both are only concerned with the output and have no bearing on what resources are imported into the project.

Once a Project is created, the user is presented with a very empty workspace into which media can be imported. As I noted in my quick look at this tool, the decision taken by Magix to ignore the style guide for Windows application is a little frustrating. Microsoft provide perfectly adequate standard controls for buttons, lists and dialogs and yet the designers here have chosen to go their own way. Magix is not alone in this, but I do find it perplexing that application creators feel the need to personalise their interfaces at the expense of user familiarity.

Adding Media
Magix makes it straightforward to add video or audio to the project. Media can either be imported directly from a device, such as a HDV or DV camera, or by navigating the local file system to find the relevant files. The preview player provides a way to check the imported media with some basic clipping tools in the player itself to trim any unwanted parts of the video.
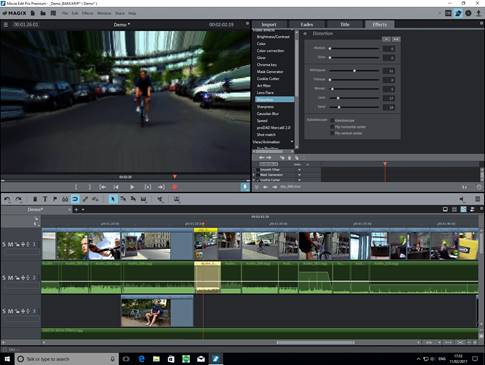
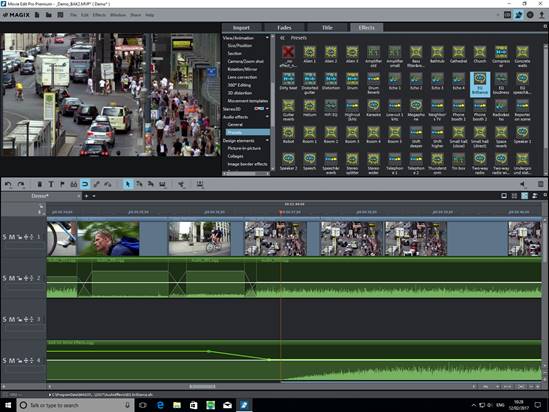
Once media is present, it can be added to the storyboard in the lower half of the application through simple drag and drop. The storyboard has a number of useful modes for displaying an overview of the project – as a simple storyboard, where each scene of the project is shown sequentially, a scene overview and finally a timeline view. I found the timeline view by far and away the most logical way to view a project since it makes visualisation of the length of the project and the placement of objects much clearer (see below). Creating multiple tracks (up to 99) is a breeze in this view, and selectively muting individual tracks during previews is simple.
Slicing and Splicing
All the tools a user would expect to find for trimming and joining video together are present and are straightforward to use. Video can be placed on the timeline and then cut as required, with the user then having the option to drag subsequent video closer to fill the gap or insert new media. Any audio with the video appears as a separate track, making it straightforward to replace or manipulate existing audio with little effort during editing.
Fade to Black
There are plenty of fade and transition effects in the package to keep even the most enthusiastic home movie enthusiast happy. Personally, I tend to use transitions sparingly, and the default behaviour of Movie Edit Pro is to offer a hard cut, where one video segment cuts abruptly into the next. This can easily be made into a more pleasing fade simply by dragging one clip over the other in the timeline, which is an intuitive approach. The length of the fade is governed simply by how much of the timeline overlaps.
Moving beyond simple fades is again, very straightforward and intuitive. Selecting a fade type from the Media Pool and dropping it into the timeline into the required place adds the effect, and it is then a simple case of resizing or repositioning the object within the timeline to get the desired fade length.
And goodness, there are a lot fades and transitions to choose from. From a personal perspective, I would recommend using these sparingly in order to keep a production looking professional, but it is good to know the Movie Edit Pro can cater to most tastes.
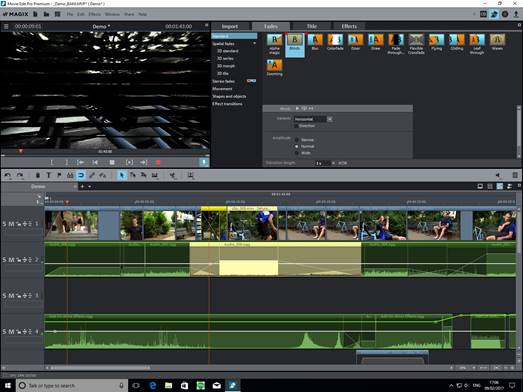
As well as the standard collection of fades (the ‘Blinds’ fade is shown in the screenshot above), which also includes flying scenes, crossfades and zooming effects amongst others. Movie Edit Pro also provides many 3D transitions ranging from cube rotations, through splintering videos to wrapping video around a slightly disturbing 3D heart shape, with just about every 80s pop music video effect you can imagine in between.
While the various types of fade and transition may not be to everyone’s taste (and certainly not mine) they are easy to configure and also do not interfere too much with the tools for actually editing a video.
Titles and Text
Adding titles to video has come on a long way since I used to do battle with a recalcitrant Genlock on a shiny new Commodore Amiga. Movie Edit Pro has a range of titling options allowing intro and outro text (for those all-important credits, or just to explain what the video is about) as well as overlays (useful for branding effects) and manually positioned text (allowing for effects such as speech bubbles.)
As with transitions, it is a simple matter of selecting the title type from the wide range of samples or opting for the manual approach of creating titles without a template, and then dropping the titles onto the timeline from where their duration can be edited.
As one would expect, the text itself can be displayed in any of the local fonts with the usual size and colour options. Positioning is a visual affair, and text may also be resized and rotated within the preview video window with font size automatically adjusting to fit.
Going further, one may also configure animations (for example, having text ‘fly’ in or out of the video frame) and additional formatting options for transparency or shadows are also available.
3D titles are also available, with animated or static options provided. As with fades and transitions, Movie Edit Pro has a wide selection of templates to work from although care must be taken to avoid overuse. It is also worth noting that when working with 3D titles, I experienced a number of crashes due to video driver issues with hardware acceleration.
Finally, it is possible to add a timecode as a title, which may be the time position in the video itself or if the original media was timestamped (for example from a DV camera) then this value may be used.
Effectiveness of Effects
The range of effects, and the potential for transforming a video made in amateur hour to something rather more professional is particularly impressive in Movie Edit Pro.
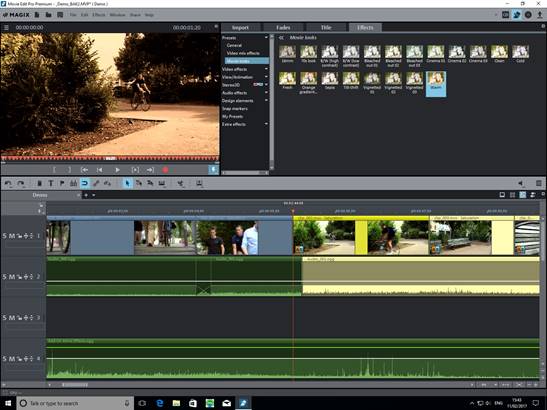
For instant gratification, Movie Edit Pro provides a number of pre-sets to save those happier using filters on their smartphone pictures rather than fiddling with contrast and colour settings. These work well, and a good selection is provided (see screen-shot above). However, it is worth noting that I did experience a few crashes in this section, notably when trying out the Tilt-Shift filter.
Moving beyond the pre-sets, the tools become more professional and more complicated to use. Starting deceptively simply with tools to adjust the brightness and contrast of one or more video objects, the user may also fiddle with the gamma to adjust darker or lighter areas of the video, HDR gamma to work with very dark areas and HDR blur, which works on the transition between light and dark areas.
Moving on to colour, it is possible to adjust the colour temperature of a video or image by manually selecting a white (or neutral) point in the video. Red-eye effects may also be removed by clicking on affected pupils. Saturation may be adjusted to achieve a natural colouration (or unnatural, if that’s the aim) and finally the hue and base Red Green and Blue values may be adjusted proportionately to create to some truly unpleasant effects (in my hands, at least).
Chroma keying effects are available to mix two video objects into a foreground and background. The colour that will become transparent and allow the second video to show through can be selected with options to set a range of transparent colours with thresholds to tune the results. In my experience this was a little hit and miss, but a potential solution for occasions where no pure green-screen type recording environment is available.
Cropping of the video itself (for picture-in-picture or just for the heck of it) is available with a variety of stamp shapes (or ‘cookie cutters’). The size and position of the shape is controlled through sliders rather than allowing editing in the preview window (as with text) which is a shame, and a little inconsistent. This is true of the majority of the effects options, which can feel a little jarring.
Similarly, the lens flare effect (a popular tool for 90s science fiction and famously overused in 2009’s reboot of the Star Trek franchise) does not allow positioning in the preview window, instead relying on the use to move the flare point using sliders as below:
The Art filters allow for a patchwork effect to be applied to video sources as well as embossing and colourising with options for colour substitutions and quantisation to reduce the overall number of colours in the image. Again, the usefulness of these functions will depend very much on the taste of the user. Certainly, it is possible to recreate many of the effects seen in 1980s episodes of Doctor Who unless care is taken.
The Distortion filters are great fun, allowing for pixilation through the mosaic setting – a neat way of getting that 8 bit retro look. Other distortions allow the application of a whirlpool, breaking the image into sand and applying a lens effect slightly reminiscent of tunnel vision (see below).
The sharpness of video elements may also be adjusted using either a normal blurring technique to reduce image noise or an ‘artistic’ blur, which is considerably more aggressive, but also more configurable with options to blur vertically or horizontally.
The speed of a video may also be adjusted to get anything from a slow-motion effect to something more akin to a Benny Hill sketch. Movie Edit Pro has the option to interpolate frames to avoid lag in a slowed down video as well as maintain the pitch of the audio if required (to avoid slurring or squeaking, unless that is the desired effect).
The proDAD Mercalli 2.0 add-in is provided to deal with the effects of a shaky handed camera operator with options to stabilise the video as well as resolving uneven zooms and pans. Horizontal and vertical tilt may also be adjusted. During my testing, I found this an excellent tool to improve the quality of hand-held footage shot on a smartphone and felt it was vastly superior to that device’s inbuilt stabilisation technology. Another very useful feature is the ability to see a comparison of the video before and after the stabilisation is applied.
The last video effect of note is the one that I found the most useful. This is the ability to match the appearance of two video clips automatically (for example, where the same scene has been filmed by two different cameras from different perspectives or if the same scene was filmed under different lighting conditions). Once a target and reference has been selected, Movie Edit Pro will match the target’s colours and tones to the reference. This works very well in practice.
Altered Views
The variety of effects available within Movie Edit Pro is impressive. However, it is the view and animation tools that really bring these to life in what is thankfully a very intuitive way.
The size and position of a video element may be edited with options to zoom and maintain the correct aspect ratio (unless a stretched or squashed image is required). As well as the full frame, it is also possible to select a section of the video and work with that.
More interesting are the camera movements that can be applied within a video section. These allow for creating the impression of panning and zooming during playback and are very simple to configure while still resulting in a very professional finish.
Slightly more esoteric are the options to rotate or mirror the video rotating using the horizontal axis and vertical axis, or a centre point. The tools are simple to use and it is straightforward to deal with a crooked horizon (or apply some mind-bending visuals).
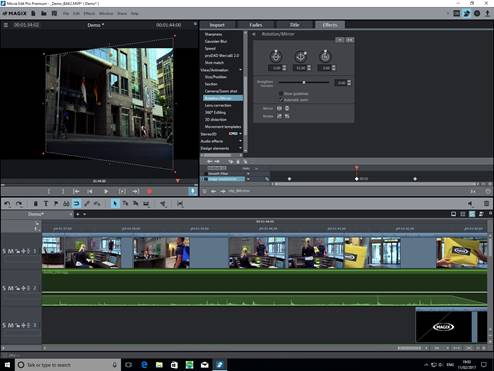
Lens correction is also possible through the view and animation options to correct distortions caused by curvature of a lens or through the ‘converging line’ effect.
Finally, extending the size tools, rotation and mirroring tools, there is the ability to apply 3D distortions to the video image through dragging anchor points in the preview window, which twists the picture through three dimensions. This could be used as part of a picture in picture placement to, for example, place a moving video on a billboard in another segment.
Before moving on to the animation tools, it is worth noting again that I found Movie Edit Pro a little unstable while testing the view tools and would recommend regular saving of work since the restore project functionality is not particularly reliable.
Re: Animation
One of the major plus points in this package is the simplicity of creating animations using the effects, views and titles described above. As with titles and fades, the effects section contains a set of standard templates that can be applied to video objects to simulate camera movement such as panning or zooming. However, through the use of key-frames and sections within videos, Movie Edit Pro will automatically animate from one key point to another. This is useful for moving the virtual camera around or using effects, such as distortion, to provide a way of transitioning between scenes.
The ease and flexibility of the animation tools is very impressive and certainly a highlight of the package, with the majority of the tools described above able to be animated and chained together to create some very professional looking results.
360 Degree Fail
Magix makes much of the 360-degree video mastering capabilities of Movie Edit Pro and it is worth noting that I was unable to make it recognise output from either a Nikon Keymission 360 or Ricoh Theta. I suspect this is more to do with the evolving standards of 360-degree video formats than Movie Edit Pro itself.
Audiophile
Importing a video object into Movie Edit Pro will automatically create an associated audio object, and additional audio tracks can be added, merged and tinkered with using a set of tools.
At a general level, it is possible to adjust the volume (and volume curve) and brightness of the audio at a high level, as well as smoothing out peaks in audio or creating distortion if required. Traditional audio processing techniques such as echo or reverb may be added as well as resampling to deal with shortened or lengthened clips.

Most interesting are the tools to clean up audio (see above). In my testing, I found these very effective and relatively simple to use. Declipping deals with the distortion effects that can occur when signal peaks in the audio are too high. Denoiser will take a sample and remove it from the audio (for example, a background hum or whir). Dehisser will deal with the white noise often associated with an analog tape recording.
As with the video effects, a large number of audio effect pre-sets are provided, some of which are perhaps a little gimmicky (including a soundtrack maker). However, a user willing to dig further into the audio tools will find a mixing desk of tools that will allow for adjustment at a near studio level (but also requiring near studio level understanding of the effect being aimed for).
Taking the high road
Amongst the 3rd party add-ins provided with Movie Edit Pro, Magix includes a basic version of the Vasco da Gama travel toolset. While a little specialist, this is a great example of the breadth of tools included in Movie Edit Pro, allowing the user to automatically add an animated map into movies with geo-tagged videos. However, like much of Movie Edit Pro, it is also an example of where an add-in can have a user interface that is a little inconsistent with other tools in the suite.
Burn Baby, Burn
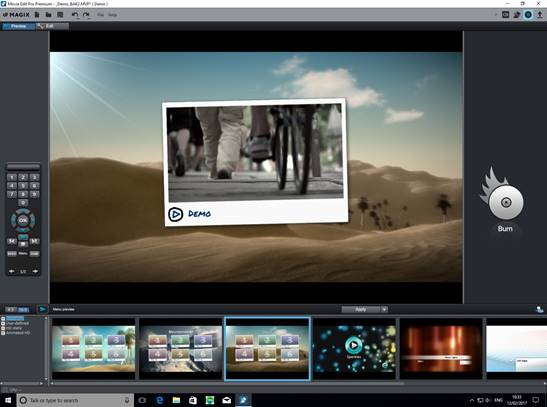
Once complete, a project can be output as a fully authored video file, uploaded to file sharing services such as YouTube or Facebook or burned to a DVD. Movie Edit Pro provides a number of DVD menu templates that are relatively intelligent and will detect chapters if the user has tagged the video appropriately. However, the functionality is a little basic and is a poor substitute for a full DVD or Blu-Ray authoring package.
Conclusion
Movie Edit Pro has a vast array of features both for the video and audio, and it is possible to produce some very professional looking output. However, those tools are undermined a little by inconsistencies in the user interfaces and a few stability problems during taxing operations. In addition, the user guide and associated documentation is occasionally a bit light and does not always match the product itself. Ultimately, if you are prepared to persevere with the occasionally frustrating interface and are familiar with digital video and audio concepts, there is a lot to like here. And at the comparatively low price point, there is much to recommend Magix Movie Edit Pro.
Hands On: Acer Predator 21X
There is a scene in the 1980’s comedy ‘Ruthless People’ where an impossibly young Judge Rheinhold ends an attempted sale of a colossal set of speakers to a young couple with the words “and when you die, they can bury you in them!”
Looking at the huge case that Acer thoughtfully includes with the Predator 21X, that line kept coming to mind.
“Look At The Size Of That Thing…”
It’s probably best to talk about the elephant in the room, or rather, the rhino on the table and deal with the sheer size of the Predator 21X. With a 21 inch curved screen and a weight of 8.5kg, this is not something that would spend a lot of time on a lap. More likely, it would be lugged from LAN party to LAN party in the plastic trunk it comes with. And that is the market Acer are aiming at here – the wealthy gamer, who has had enough of dragging their rig around the country rather than the tired commuter doing some last minute PowerPoint edits on the train to work.
Typing With Colour
Size aside, Acer provide a full sized mechanical keyboard in the chassis with a trackpad that flips to expose a numeric keypad. As a left hander, I found the location of the trackpad made it fairly useless, although the target market for this machine is likely to prefer an external mouse and will use the numeric keypad instead. As one would expect, the keyboard is backlit, with the lighting of each individual key being configurable from a choice of 16.5 million colours. This configuration can be saved into various profiles, allowing for different keyboard lighting for different games.
Display Without The DPI
The 21 inch screen should be the star of the show, and certainly looks gorgeous, with the curve of the screen giving an immersive feel to proceedings. The 120Hz refresh rate ensures the display is rock solid but the resolution of 2580 x 1080 is a little low considering the quality of the components and the dual GTX 1080 graphics cards (in SLI mode) powering it.
With Great Power Comes Great Cooling
The Predator 21X features five fans to keep everything cool and does so with a surprising lack of noise, even when all settings are cranked up to maximum. Three of those fans deal with the CPU and two GPU’s specifically and are reversible, allowing dust build-up to be blown out and hopefully increase the longevity of the components.
As one would expect, the CPU is Intel’s latest and greatest Kaby Lake Core i7-7820HK, which is overclockable and is coupled with 64GB of DD4-2400 memory along with two 512GB PCIe SSD drives (configurable as RAID 0). Performance is as blistering fast as one would expect, and in the short time I had to play with the machine, it chewed through whatever I did without hesitation.
I was also vaguely amazed to find a claimed battery life of 3.5 hours, but did not get time to test this. You get an idea of the power consumption of the Predator 21X when you see the two power supplies it needs when plugged in…
Keeping An Eye On Things
The Windows Hello compatible camera built into the Pedator 21X features the Tobii eye-tracking technology, which I found particularly impressive. In terms of entertainment it makes for a much more natural targeting experience to be able to simply look at targets on the screen (for games that support it) rather than flicking a mouse and, coupled with that wide curved screen, added to the immersive experience to the point where I felt like I was wearing VR goggles. Just without the nausea, neck-ache, and octopus of cables. However, using the eye tracking on the Windows desktop makes for exciting accessibility possibilities for users with disabilities, particularly as this technology finds its way into more entry level computers.
Conclusion
Acer are to be applauded for the sheer audaciousness of this computer. As a demonstration of what the company can do, there is nothing else quite like it on the market. It is indeed a flagship in the truest sense of the word. However, with a £10,000 price tag that could buy you a decent sized family car and give even the most ardent Apple fan pause, it is unlikely to find many buyers. But that really isn’t the point, is it?
We look at Alexa compatible devices from Netatmo and Energenie | Guest reviewer Adana covers Ruth's column this issue and makes a waterproof speaker splash | |||
Our latest recruit goes on a review binge including his promised in depth Magix Video Review | Peter reviews the newer version our give away and animates some CrazyTalk | Back to the cover |